14 Kasım 2016 Pazartesi
Configure the Fiori Launchpad Tiles using Catalogs & Groups
Configure the Fiori Launchpad Tiles using Catalogs & Groups:
https://blogs.sap.com/2015/07/13/configure-the-fiori-launchpad-tiles-using-catalogs-groups/
https://blogs.sap.com/2015/07/13/configure-the-fiori-launchpad-tiles-using-catalogs-groups/
23 Ağustos 2016 Salı
No default virus profile active or found. Please check the offical guide. ERROR
No default virus profile active or found. Please check the
offical guide. hatası alıyorsanız,
/IWFND/VIRUS_SCAN işlem kodu ile Virus Scan Switched Off active duruma getirmelisiniz.
/IWFND/VIRUS_SCAN işlem kodu ile Virus Scan Switched Off active duruma getirmelisiniz.
15 Temmuz 2016 Cuma
The server is refusing to process the request because the entity has an unsupported format
"The server is refusing to process the request because the entity has an unsupported format" hatasının çözümü için Content-Type = ...;type=entry "type=entry" eklemeniz gerekmekte.
var urlRead = "/createSet";
var headers = {
"X-Requested-With": "XMLHttpRequest",
"Accept": "application/atom+xml,application/atomsvc+xml,application/xml",
"Atom": "http://www.w3.org/2005/Atom",
"Content-Type": "application/atom+xml;type=entry",
"DataServiceVersion": "2.0"
};
var urlRead = "/createSet";
var headers = {
"X-Requested-With": "XMLHttpRequest",
"Accept": "application/atom+xml,application/atomsvc+xml,application/xml",
"Atom": "http://www.w3.org/2005/Atom",
"Content-Type": "application/atom+xml;type=entry",
"DataServiceVersion": "2.0"
};
8 Temmuz 2016 Cuma
sapui5 specific version
Specific Version
Check the available versions with respective maintenance status at https://sapui5.hana.ondemand.com/versionoverview.html and https://openui5.hana.ondemand.com/versionoverview.html.
You can refer to a specific version by using a versioned URL as in the example below:
SAPUI5
|
OpenUI5
|
|---|---|
<script id="sap-ui-bootstrap" type="text/javascript" src="https://sapui5.hana.ondemand.com/1.32.7/resources/sap-ui-core.js" data-sap-ui-theme="sap_bluecrystal" data-sap-ui-libs="sap.m"></script> | <script id="sap-ui-bootstrap" type="text/javascript" src="https://openui5.hana.ondemand.com/1.32.7/resources/sap-ui-core.js" data-sap-ui-theme="sap_bluecrystal" data-sap-ui-libs="sap.m"></script> |
24 Mayıs 2016 Salı
Sap Sorgu taşıma -sq01
SAP sisteminde oluşturduğunuz sorguları farklı sistemlere taşıyabilmek için RSAQR3TR programını kullanabilirsiniz.Aldığınız requesti diğer sistemlere taşıtırsanız aynı sorguyu elde etmiş olursunuz.
26 Nisan 2016 Salı
403 HTTP response - CSRF token validation failed
403 HTTP response - CSRF token validation failed hatasını düzeltmek için
1-sicf-> z*srv servisinizi bulun.Service Data->GUI conf.
~CHECK_CSRF_TOKEN = 0 parametresini ekleyin.
2-Ben karşılaştığım için ekledim.Belki sizde olmayabilir.Odata modelinizin header'ı da açağıdaki gibi olmalı.
var headers = {
"X-Requested-With": "XMLHttpRequest",
"Accept": "application/atom+xml,application/atomsvc+xml,application/xml",
"Content-Type": "application/atom+xml",
"DataServiceVersion": "2.0" };
oModel.setHeaders(headers);
22 Mart 2016 Salı
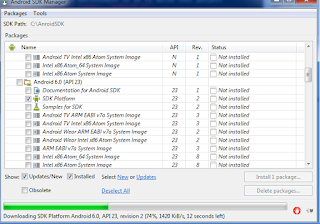
Error:Please install Android target: "android-23" çözümü
Error:Please install Android target: "android-23" çözümü
1-
2-Install Android SDK 23
3-Build cordova device OK:
1-
2-Install Android SDK 23
3-Build cordova device OK:
21 Mart 2016 Pazartesi
SWETYPV - Display/Maint. Event Type Linkages debug
Event type için Z'li function tanımladıktan sonra event'ınızın debug'a düşmesi için CL_SWF_EVT_STRATEGY_BOR_FB class'ının PROCESS methodunu kullanabilirsiniz.
Debug mode için = me->m_process_mode = D olmalı
Debug mode için = me->m_process_mode = D olmalı
17 Mart 2016 Perşembe
Android native back button
SAPUI5 uygulamanızı geliştirdiniz.Android,ios application olarak uygulamanızı derlediniz.Ama telefon alışkanlıklarından dolayı cihazların back tuşunu unutmuş olabilirsiniz.Aşağıdaki kod bloğu android cihazınızın back butonu ile önceki sayfaya gitmesini sağlayacaktır.
onInit : function() {
document.addEventListener("deviceready", function() {
this.onDeviceReady();
}.bind(this),false);
},
onDeviceReady: function() {
document.addEventListener("backbutton", function() {
this.backKeyDown();
}.bind(this),false);
//boot your app...
},
backKeyDown: function() {
// do something here if you wish
// alert('go back!');
this.nav.back("Detail");
}
13 Mart 2016 Pazar
sapui5 seçim ekranı oluşturma-Filter Tab
Abap selection screen'larımızı xmlns:fb="sap.ui.comp.filterbar" namespace'nı kullarak hazırlayabilirsiniz.
<fb:FilterBar
reset="onReset"
search="onSearch"
showClearButton="true"
showRestoreButton="true">
<fb:filterItems>
<fb:FilterItem label="Şirket kodu:" mandatory="true" name="A">
<fb:control>
<MultiComboBox id="filterCompany" items="{ path: 'filterWorkorder>/WorkorderFilter', sorter: { path: 'Name' } }" selectedKeys="1000" selectionChange="handleSelectionChange"
selectionFinish="handleSelectionFinish" textAlign="Left" width="200px">
<core:Item key="{filterWorkorder>Company}" text="{filterWorkorder>Company}"/>
</MultiComboBox>
</fb:control>
</fb:FilterItem>
<fb:FilterItem label="Sorumlu işyeri" labelTooltip="Tooltip Example" mandatory="true" name="B">
<fb:control>
<MultiComboBox id="filterResponsive" items="{ path: 'filterWorkorder>/WorkorderFilter', sorter: { path: 'Name' } }" selectedKeys="2312-121-952" selectionChange="handleSelectionChange"
selectionFinish="handleSelectionFinish" textAlign="Left" width="200px">
<core:Item key="{filterWorkorder>Responsive}" text="{filterWorkorder>Responsive}"/>
</MultiComboBox>
</fb:control>
</fb:FilterItem>
</fb:filterItems>
<fb:filterGroupItems>
</fb:filterGroupItems>
</fb:FilterBar>
10 Mart 2016 Perşembe
sapui5 page print
Sapui5 page üzerinde print işlemlerini rahatlıkla yapabilirsiniz.Yapmanız gereken window API'lerini çalıştırmak.Print yapmak istediğiniz kayıtları loop ile döndürerek TR/TD combinasyonunda döndürmeniz gerekecek.Print işlemi için basit kod bloğunu aşağıda bulabilirsiniz.
var table = this.getView().byId("__table0").getBinding("items").oList;
//Will give you list of indices after filter & sort
// var filteredIndices = table.getBinding().aIndices;
for(var index=0;index<table.length;index++){
console.log(table[index].Country,table[index].City);
//dataArray.push(aData[filteredIndices[index]]);
}
var body=
"<table id='example' class='display' cellspacing='0' width='100%'>"+
"<thead>"+
"<tr>"+
"<th>Name</th>"+
"<th>Position</th>"+
"<th>Office</th>"+
"<th>Age</th>"+
"<th>Start date</th>"+
"<th>Salary</th>"+
"</tr>"+
"</thead>"+
"<tfoot>"+
"<tr>"+
"<th>Name</th>"+
"<th>Position</th>"+
"<th>Office</th>"+
"<th>Age</th>"+
"<th>Start date</th>"+
"<th>Salary</th>"+
"</tr>"+
"</tfoot>"+
"<tbody>"+
"<tr>"+
"<td>Tiger Nixon</td>"+
"<td>System Architect</td>"+
"<td>Edinburgh</td>"+
"<td>61</td>"+
"<td>2011/04/25</td>"+
"<td>$320,800</td>"+
"</tr>"+
"<tr>"+
"<td>Garrett Winters</td>"+
"<td>Accountant</td>"+
"<td>Tokyo</td>"+
"<td>63</td>"+
"<td>2011/07/25</td>"+
"<td>$170,750</td>"+
"</tr>"+
"</tbody>"+
"</table>";
var size = "width=500px;height=600px";
var wind = window.open("","Print Document",size);
wind.document.write(body);
wind.print();
wind.close();
9 Mart 2016 Çarşamba
Web service call in the sapui5 page
Sapui5 page içerisinde odata servislerini rahatlıkla kullanabiliyoruz.Ama bazı durumlarda web service'ler ile bağlantı yapmak gerekebilir.Aşağıdaki kod bloğu ile herhangi bir web service'ne bağlanabilirsiniz.
var oModel;
$.ajax({
url: "http://www.webservicex.net/globalweather.asmx/GetCitiesByCountry?CountryName=Turkey",
type: "GET",
dataType: "xml",
//data: "CountryName=Turkey",
contentType: "text/xml",
success: jQuery.proxy(function(data, textStatus) {
// console.log("data" + data);
// NewDataSet
var x2js = new X2JS();
var jsonObj = x2js.xml_str2json(data.documentElement.textContent);
oModel = new sap.ui.model.json.JSONModel(jsonObj);
this.getView().setModel(oModel, "Weather");
}, this),
error: jQuery.proxy(function(data, status, error) {
console.log("hata oluştuERROR");
}, this)
});
25 Şubat 2016 Perşembe
TMDIR tablosu
Bazı anlarda ilgili class'ı bulmak gerekebilir.Elinizde sadece method ismi vardır.TMDIR tablosundan class-method ilişkisini bulabilirsiniz.
15 Şubat 2016 Pazartesi
SAP Web IDE 1602 local web ide kurma
SAP Web IDE 1602 local web ide için yapmanız gereken tek şey http://scn.sap.com/docs/DOC-58926 adresinden local web ide klasörü indirmek ve orion.exe çalıştırmak.Yeni kullanıcı oluşturarak local web idenizi kullanabilirsiniz.
http://localhost:8080/webide/index.html default olarak çalışacaktır.İsterseniz 8080 portunu orion.ini dosyasından değiştirebilirsiniz.
11 Şubat 2016 Perşembe
Demo abap program paket
SABAPDEMOS paketinden demo abap programlarını görebilirsiniz.Hana ile ilgili örnek programlar da yeni versiyonlarda gelmiş.
10 Şubat 2016 Çarşamba
New Version of SAP Web IDE Released for Local Installation
New Version of SAP Web IDE Released for Local Installation aşağıdaki link'den indirip kurabilirsiniz.
http://scn.sap.com/docs/DOC-58926
30 Ocak 2016 Cumartesi
Cleanup Cache /IWFND/CACHE_CLEANUP
Odata servislerinizi tanımladıktan sonra bazı field'leri ekleyip çıkarabilirsiniz.Bu gibi durumlarda odata servislerinizin cache'lerini silmeniz gerekebilir.Yapmanız gereken /IWFND/CACHE_CLEANUP işlem kodunu çalıştırmak.İstediğiniz odata servisini veya tüm Z'li modellerinizin cache'lerini silebilirsiniz.

18 Ocak 2016 Pazartesi
Müşteri siparişi servisini aktif etme
14 Ocak 2016 Perşembe
/UI5/UI5_REPOSITORY_LOAD programı ile sapui5 dosyaları
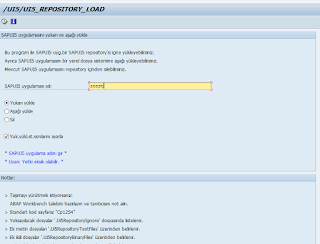
/UI5/UI5_REPOSITORY_LOAD standart programı ile sapui5-fiori geliştirmelerinizi SAP sistemine import edebilirsiniz.
1-se38 işlem kodu ile /UI5/UI5_REPOSITORY_LOAD programını çalıştırın.
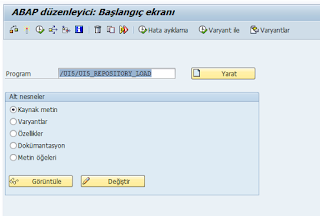
2-Program ekranı geltikten sonra projenizin adını girin.Z* isim verin.Default ayarları ile Execute edin
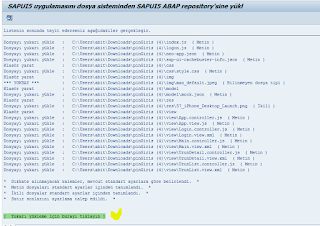
3-İmport etmek istediğiniz dosyanın yolunu girip devam edin.Tüm dosya içeriği yüklendikten sonra çıkan ekran da yeşil renkli link'i tıklayarak devam edin.
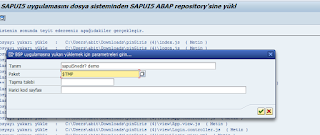
4-Artık BSP projeniz oluştururmuş gibi Paket,Request,Tanım bilgilerini girin.
5-Projenizi BSP projelerinin altında görebilirsiniz.
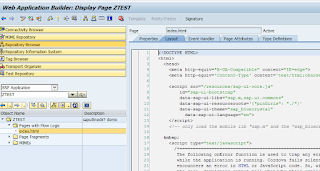
6-Pages with Flow Logic dosyasındaki index.html sayfasını execute ederek artık sapui5-fiori uygulamanızı kullanabilirsiniz.Geliştirdiğiniz versiyon ile sap sisteminizdeki versiyon uyuşmazlığından dolayı aşağıdaki gibi hatalar ile karşılaşabilirsiniz.
1-se38 işlem kodu ile /UI5/UI5_REPOSITORY_LOAD programını çalıştırın.

2-Program ekranı geltikten sonra projenizin adını girin.Z* isim verin.Default ayarları ile Execute edin

3-İmport etmek istediğiniz dosyanın yolunu girip devam edin.Tüm dosya içeriği yüklendikten sonra çıkan ekran da yeşil renkli link'i tıklayarak devam edin.

4-Artık BSP projeniz oluştururmuş gibi Paket,Request,Tanım bilgilerini girin.

5-Projenizi BSP projelerinin altında görebilirsiniz.

6-Pages with Flow Logic dosyasındaki index.html sayfasını execute ederek artık sapui5-fiori uygulamanızı kullanabilirsiniz.Geliştirdiğiniz versiyon ile sap sisteminizdeki versiyon uyuşmazlığından dolayı aşağıdaki gibi hatalar ile karşılaşabilirsiniz.
12 Ocak 2016 Salı
/IWFND/GW_CLIENT - İşlem kodu ile oDATA servislerini TEST&DEBUG etme
/IWFND/GW_CLIENT - İşlem kodu ile oDATA servislerini TEST&DEBUG edebilirsiniz..Yazmış olduğunuz servisi Request URI'ye yazıp GET,POST,PUT,PATCH,MERGE,DELETE methodlarınızı test ve debug edebilirsiniz.
1-/IWFND/GW_CLIENT - İşlem kodu ile Gateway client ekranına gidilir.
tcode: /IWFND/GW_CLIENT
2-Select 'i seçip Servisimizi bulalım.
Status code = 200 ve OK döndü.Collection tabındaki tableset'imiz ile artık işlemler yapabiliriz.Tablesetimiz :collection tagı içinde.

7-Debug işlemi sonrası dataset kümesi ekrana geldi.
1-/IWFND/GW_CLIENT - İşlem kodu ile Gateway client ekranına gidilir.
tcode: /IWFND/GW_CLIENT
2-Select 'i seçip Servisimizi bulalım.
Status code = 200 ve OK döndü.Collection tabındaki tableset'imiz ile artık işlemler yapabiliriz.Tablesetimiz :collection tagı içinde.

5-TAKSITSET_GET_ENTITYSET method'u içine External Debug koydum.Bu şekilde diğer method'ları da debug edebilirsiniz.
7-Debug işlemi sonrası dataset kümesi ekrana geldi.
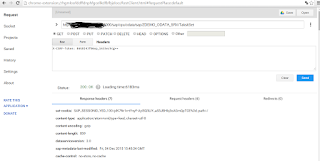
8-SAP dışın da da ODATA servislerini kullanabilirsiniz.Yine aynı işlemleri yapabilirsiniz.Chrome Advanced REST client uzantısını ekleyerek Odata servislerini test ve debug edebilirsiniz .
Kaydol:
Yorumlar (Atom)


