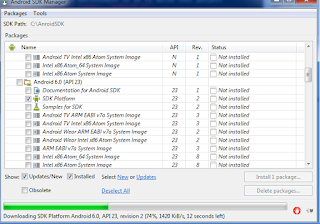
Error:Please install Android target: "android-23" çözümü
1-
2-Install Android SDK 23
3-Build cordova device OK:
22 Mart 2016 Salı
21 Mart 2016 Pazartesi
SWETYPV - Display/Maint. Event Type Linkages debug
Event type için Z'li function tanımladıktan sonra event'ınızın debug'a düşmesi için CL_SWF_EVT_STRATEGY_BOR_FB class'ının PROCESS methodunu kullanabilirsiniz.
Debug mode için = me->m_process_mode = D olmalı
Debug mode için = me->m_process_mode = D olmalı
17 Mart 2016 Perşembe
Android native back button
SAPUI5 uygulamanızı geliştirdiniz.Android,ios application olarak uygulamanızı derlediniz.Ama telefon alışkanlıklarından dolayı cihazların back tuşunu unutmuş olabilirsiniz.Aşağıdaki kod bloğu android cihazınızın back butonu ile önceki sayfaya gitmesini sağlayacaktır.
onInit : function() {
document.addEventListener("deviceready", function() {
this.onDeviceReady();
}.bind(this),false);
},
onDeviceReady: function() {
document.addEventListener("backbutton", function() {
this.backKeyDown();
}.bind(this),false);
//boot your app...
},
backKeyDown: function() {
// do something here if you wish
// alert('go back!');
this.nav.back("Detail");
}
13 Mart 2016 Pazar
sapui5 seçim ekranı oluşturma-Filter Tab
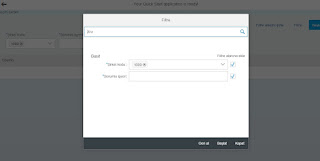
Abap selection screen'larımızı xmlns:fb="sap.ui.comp.filterbar" namespace'nı kullarak hazırlayabilirsiniz.
<fb:FilterBar
reset="onReset"
search="onSearch"
showClearButton="true"
showRestoreButton="true">
<fb:filterItems>
<fb:FilterItem label="Şirket kodu:" mandatory="true" name="A">
<fb:control>
<MultiComboBox id="filterCompany" items="{ path: 'filterWorkorder>/WorkorderFilter', sorter: { path: 'Name' } }" selectedKeys="1000" selectionChange="handleSelectionChange"
selectionFinish="handleSelectionFinish" textAlign="Left" width="200px">
<core:Item key="{filterWorkorder>Company}" text="{filterWorkorder>Company}"/>
</MultiComboBox>
</fb:control>
</fb:FilterItem>
<fb:FilterItem label="Sorumlu işyeri" labelTooltip="Tooltip Example" mandatory="true" name="B">
<fb:control>
<MultiComboBox id="filterResponsive" items="{ path: 'filterWorkorder>/WorkorderFilter', sorter: { path: 'Name' } }" selectedKeys="2312-121-952" selectionChange="handleSelectionChange"
selectionFinish="handleSelectionFinish" textAlign="Left" width="200px">
<core:Item key="{filterWorkorder>Responsive}" text="{filterWorkorder>Responsive}"/>
</MultiComboBox>
</fb:control>
</fb:FilterItem>
</fb:filterItems>
<fb:filterGroupItems>
</fb:filterGroupItems>
</fb:FilterBar>
10 Mart 2016 Perşembe
sapui5 page print
Sapui5 page üzerinde print işlemlerini rahatlıkla yapabilirsiniz.Yapmanız gereken window API'lerini çalıştırmak.Print yapmak istediğiniz kayıtları loop ile döndürerek TR/TD combinasyonunda döndürmeniz gerekecek.Print işlemi için basit kod bloğunu aşağıda bulabilirsiniz.
var table = this.getView().byId("__table0").getBinding("items").oList;
//Will give you list of indices after filter & sort
// var filteredIndices = table.getBinding().aIndices;
for(var index=0;index<table.length;index++){
console.log(table[index].Country,table[index].City);
//dataArray.push(aData[filteredIndices[index]]);
}
var body=
"<table id='example' class='display' cellspacing='0' width='100%'>"+
"<thead>"+
"<tr>"+
"<th>Name</th>"+
"<th>Position</th>"+
"<th>Office</th>"+
"<th>Age</th>"+
"<th>Start date</th>"+
"<th>Salary</th>"+
"</tr>"+
"</thead>"+
"<tfoot>"+
"<tr>"+
"<th>Name</th>"+
"<th>Position</th>"+
"<th>Office</th>"+
"<th>Age</th>"+
"<th>Start date</th>"+
"<th>Salary</th>"+
"</tr>"+
"</tfoot>"+
"<tbody>"+
"<tr>"+
"<td>Tiger Nixon</td>"+
"<td>System Architect</td>"+
"<td>Edinburgh</td>"+
"<td>61</td>"+
"<td>2011/04/25</td>"+
"<td>$320,800</td>"+
"</tr>"+
"<tr>"+
"<td>Garrett Winters</td>"+
"<td>Accountant</td>"+
"<td>Tokyo</td>"+
"<td>63</td>"+
"<td>2011/07/25</td>"+
"<td>$170,750</td>"+
"</tr>"+
"</tbody>"+
"</table>";
var size = "width=500px;height=600px";
var wind = window.open("","Print Document",size);
wind.document.write(body);
wind.print();
wind.close();
9 Mart 2016 Çarşamba
Web service call in the sapui5 page
Sapui5 page içerisinde odata servislerini rahatlıkla kullanabiliyoruz.Ama bazı durumlarda web service'ler ile bağlantı yapmak gerekebilir.Aşağıdaki kod bloğu ile herhangi bir web service'ne bağlanabilirsiniz.
var oModel;
$.ajax({
url: "http://www.webservicex.net/globalweather.asmx/GetCitiesByCountry?CountryName=Turkey",
type: "GET",
dataType: "xml",
//data: "CountryName=Turkey",
contentType: "text/xml",
success: jQuery.proxy(function(data, textStatus) {
// console.log("data" + data);
// NewDataSet
var x2js = new X2JS();
var jsonObj = x2js.xml_str2json(data.documentElement.textContent);
oModel = new sap.ui.model.json.JSONModel(jsonObj);
this.getView().setModel(oModel, "Weather");
}, this),
error: jQuery.proxy(function(data, status, error) {
console.log("hata oluştuERROR");
}, this)
});
Kaydol:
Yorumlar (Atom)


